My Boids and Inverse Kinematics Visualization
As usual when I’m bored and in search of a new project to create, instead of studying for my exams, I have stumbled upon the topics of boids (flocking simulation) and inverse kinematics from @TheCodingTrain, and thought why not combine them into one project and create a a simple fish tank simulation. I mean how hard could it be, right?
Setting up the project
Unfortunately, the coding train videos are with a framework called p5.js, which I am not familiar with, so I decided to use raylib instead. I have used raylib in the past and I am quite comfortable with it. Although javascript implementation is probably easier to understand and implement, I wanted to challenge myself and try to implement it in C++.
Setting up the raylib project
First of all I have created a class named App this class will be the main class of the project which will handle the application loop window creation and the input handling.
 1class App
 2{
 3    App();
 4
 5public:
 6    ~App();
 7    static App &GetInstance();
 8    void Run();
 9
10private:
11    void Update();
12    void Draw();
13    void HandleInput();
14
15private:
16    float m_width = 1512;
17    float m_height = 864;
18
19    std::string m_title = "Boids Simulation";
20
21    std::vector<std::shared_ptr<Boid>> m_boids;
22};
This is just my boilerplate code for any project that I am starting with raylib. Please don’t judge my usage of Singleton pattern, I know it’s not the best practice but it works for me.
 1App::App()
 2{
 3    InitWindow(this->m_width, this->m_height, this->m_title.c_str());
 4    SetTargetFPS(60);
 5
 6    for (int i = 0; i < 50; i++)
 7    {
 8        this->m_boids.push_back(std::make_shared<Boid>());
 9    }
10}
On the constructor of the App class I basically initialized the window and the boids vector with 50 boids. Probably because of my implementation of this is not the best I had to use 50 as a starting point. (I think inverse kinematics part takes a lot of performance so I had to limit the number of boids)
 1void App::Run()
 2{
 3    while (!WindowShouldClose())
 4    {
 5        this->HandleInput();
 6        this->Update();
 7        this->Draw();
 8    }
 9}
10
11void App::Update()
12{
13    for (auto &boid : this->m_boids)
14    {
15        boid->Edges();
16        boid->Flock(this->m_boids);
17        boid->Update();
18    }
19}
20
21void App::Draw()
22{
23    BeginDrawing();
24    ClearBackground(BLACK);
25    for (auto &boid : this->m_boids)
26    {
27        boid->Draw();
28    }
29    EndDrawing();
30}
On these three functions basically Run starts the simulation loop. Update function updates the boids behavior (make sure that they come back from the opposite side of the screen when they go out of the screen, flocking behavior, and updating the position of the boid). Draw function clears the screen and draws the boids.
Boids
Now to understand how the boids (flocking) work I suggest you to watch the video that I have linked above. But in short, boids have three main rules:
- Separation: Boids try to keep a small distance from each other.
- Alignment: Boids try to align their velocity with the average velocity of their neighbors.
- Cohesion: Boids try to move towards the average position of their neighbors.
This is the main idea of Craig Reynolds who is the creator of the boids simulation.
1. Separation
1Vector2 m_position = {(float)GetScreenWidth() / 2, (float)GetScreenHeight() / 2};
2
3Vector2 m_velocity;
4Vector2 m_acceleration;
5
6float m_maxForce = 0.2f;
7float m_maxSpeed = 4.0f;
As you can see my boid class has these parameters which are the position, velocity, acceleration, max force, and max speed.
 1Vector2 Boid::Separation(std::vector<std::shared_ptr<Boid>> &boids)
 2{
 3    // Separation: Steering to avoid crowding local flockmates
 4
 5    Vector2 sum = {0, 0};
 6    int count = 0;
 7
 8    for (const auto &boid : boids)
 9    {
10        float distance = Vector2Distance(this->m_position, boid->m_position);
11
12        // Check if the boid is within a certain range (you can experiment with this range)
13        if (distance > 20 && distance < 100 && boid != shared_from_this())
14        {
15            Vector2 diff = Vector2Subtract(this->m_position, boid->m_position);
16            diff = Vector2Normalize(diff); // Normalize the difference vector
17            diff.x /= distance;            // Weight by distance
18            diff.y /= distance;            // Weight by distance
19            sum.x += diff.x;
20            sum.y += diff.y;
21            count++;
22        }
23    }
24
25    if (count > 0)
26    {
27        sum.x /= static_cast<float>(count);
28        sum.y /= static_cast<float>(count);
29
30        sum = Vector2Normalize(sum); // Normalize the result
31        sum.x *= m_maxSpeed;         // Scale to the maximum speed
32        sum.y *= m_maxSpeed;         // Scale to the maximum speed
33        sum.x -= m_velocity.x;       // Subtract current velocity to get steering force
34        sum.y -= m_velocity.y;       // Subtract current velocity to get steering force
35        sum = Vector2Normalize(sum); // Make sure the force does not exceed the maximum force
36        sum.x *= m_maxForce;
37        sum.y *= m_maxForce;
38    }
39
40    return sum;
41}
This is the separation function of the boid class. Basically, it calculates the steering force that the boid should apply to avoid crowding local flockmates. It calculates the average of the difference vectors between the boid and its neighbors and normalizes it. Then it scales it to the maximum speed and subtracts the current velocity to get the steering force. Finally, it normalizes the result and scales it to the maximum force.
With this function the boids will try to keep a small distance from each other.
2. Alignment
 1Vector2 Boid::Align(std::vector<std::shared_ptr<Boid>> &boids)
 2{
 3    // Alignment: Steering towards the average heading of local flockmates
 4
 5    Vector2 sum = {0, 0};
 6    int count = 0;
 7
 8    for (const auto &boid : boids)
 9    {
10        float distance = Vector2Distance(this->m_position, boid->m_position);
11
12        // Check if the boid is within a certain range (you can experiment with this range)
13        if (distance > 0 && distance < 100 && boid != shared_from_this())
14        {
15            sum.x += boid->m_velocity.x;
16            sum.y += boid->m_velocity.y;
17            count++;
18        }
19    }
20
21    if (count > 0)
22    {
23        sum.x /= static_cast<float>(count);
24        sum.y /= static_cast<float>(count);
25
26        sum = Vector2Normalize(sum); // Normalize the result
27        sum.x *= m_maxSpeed;         // Scale to the maximum speed
28        sum.y *= m_maxSpeed;         // Scale to the maximum speed
29        sum.x -= m_velocity.x;       // Subtract current velocity to get steering force
30        sum.y -= m_velocity.y;       // Subtract current velocity to get steering force
31        sum = Vector2Normalize(sum); // Make sure the force does not exceed the maximum force
32        sum.x *= m_maxForce;
33        sum.y *= m_maxForce;
34    }
35
36    return sum;
37}
This is the alignment function of the boid class. Basically, it calculates the steering force that the boid should apply to align its velocity with the average velocity of its neighbors. It calculates the average of the velocities of the boid’s neighbors and normalizes it. Then it scales it to the maximum speed and subtracts the current velocity to get the steering force. Finally, it normalizes the result and scales it to the maximum force.
With this function the boids will try to align their velocity with the average velocity of their neighbors.
3. Cohesion
 1Vector2 Boid::Cohesion(std::vector<std::shared_ptr<Boid>> &boids)
 2{
 3    // Cohesion: Steering to move towards the average position of local flockmates
 4
 5    Vector2 sum = {0, 0};
 6    int count = 0;
 7
 8    for (const auto &boid : boids)
 9    {
10        float distance = Vector2Distance(this->m_position, boid->m_position);
11
12        // Check if the boid is within a certain range (you can experiment with this range)
13        if (distance > 0 && distance < 100 && boid != shared_from_this())
14        {
15            sum.x += boid->m_position.x;
16            sum.y += boid->m_position.y;
17            count++;
18        }
19    }
20
21    if (count > 0)
22    {
23        sum.x /= static_cast<float>(count);
24        sum.y /= static_cast<float>(count);
25
26        Vector2 desired = Vector2Subtract(sum, this->m_position);
27        desired = Vector2Normalize(desired); // Normalize the result
28        desired.x *= m_maxSpeed;             // Scale to the maximum speed
29        desired.y *= m_maxSpeed;             // Scale to the maximum speed
30
31        Vector2 steering = Vector2Subtract(desired, m_velocity); // Calculate steering force
32        steering = Vector2Normalize(steering);                   // Make sure the force does not exceed the maximum force
33        steering.x *= m_maxForce;
34        steering.y *= m_maxForce;
35
36        return steering;
37    }
38
39    return sum;
40}
In this function, the boid calculates the steering force that it should apply to move towards the average position of its neighbors. It calculates the average position of the boid’s neighbors and normalizes it. Then it scales it to the maximum speed and subtracts the current velocity to get the steering force. Finally, it normalizes the result and scales it to the maximum force.
Boids will try to move towards the average position of their neighbors with this function.
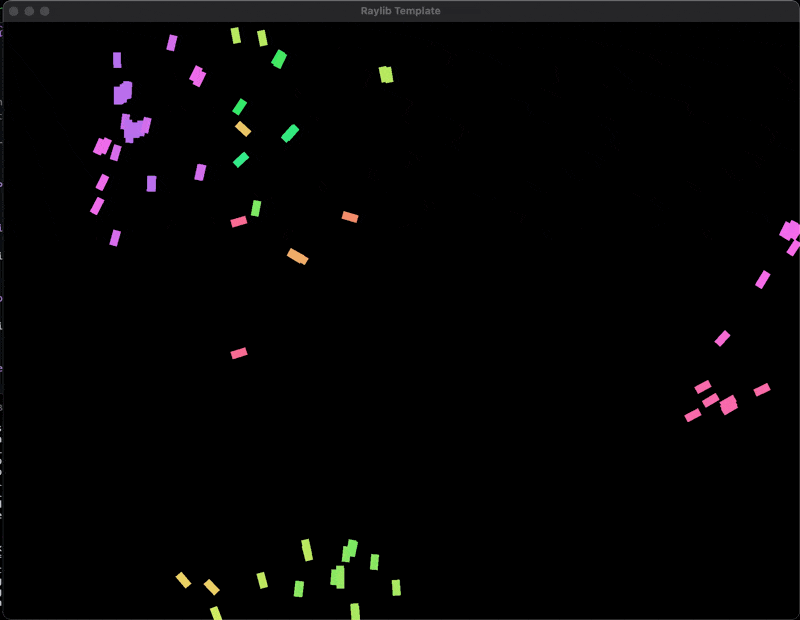
This is the result of the boids simulation. As you can see the boids are trying to keep a small distance from each other, align their velocity with the average velocity of their neighbors, and move towards the average position of their neighbors.
And now let’s move on to the inverse kinematics part and create our fishes from the boids.
Inverse Kinematics (This part has a fishy implementation 😅)
Now how the inverse kinematics work is a bit more complicated conseptually, but implementation-wise it’s not that hard. I suggest you to watch the video that I have linked above to understand the concept of inverse kinematics.
Creating fishes from inverse kinematics concept was a foreign idea to me until I have watched a video from @argonautcode. The concept was pretty intruiging, so I have decided to implement and combine with my boids implementation.
The main problem that I have faced was I couldn’t create a coherent fish from the boids at first. I have only be able to create external points for main body of the fish, basically it was looking like an earth worm instead of a fish. I had to create a couple of utility functions to fill the body of the fish and create some fins from ellipses.
But before that let’s see how the inverse kinematics works.
 1class Spine
 2{
 3public:
 4    Spine(Vector2 origin, int jointCount, int linkSize, float angleConstraint = 2 * PI);
 5    void Resolve(Vector2 pos);
 6    void Draw();
 7
 8public:
 9    std::vector<Vector2> m_joints;
10    std::vector<float> m_angles;
11    int m_linkSize;
12    float m_angleConstraint;
13};
This is the spine class that I have created for the inverse kinematics part. It has a vector of joints, angles, link size, and angle constraint. The joints are the points that the spine will be connected to. The angles are the angles between the joints.
When the Resolve function is called the spine will try to resolve the position of the joints according to the given position by changing the angles between the joints.
 1void Spine::Resolve(Vector2 pos)
 2{
 3    m_angles[0] = atan2f(pos.y - m_joints[0].y, pos.x - m_joints[0].x);
 4    m_joints[0] = pos;
 5    for (size_t i = 1; i < m_joints.size(); ++i)
 6    {
 7        float curAngle = atan2f(m_joints[i - 1].y - m_joints[i].y, m_joints[i - 1].x - m_joints[i].x);
 8        m_angles[i] = ConstrainAngle(curAngle, m_angles[i - 1], m_angleConstraint);
 9        m_joints[i] = Vector2Subtract(m_joints[i - 1], Vector2Scale((Vector2){cosf(m_angles[i]), sinf(m_angles[i])}, m_linkSize));
10    }
11}
This is the Resolve function of the spine class. It calculates the angles between the joints and the position of the joints according to the given position. It calculates the angle between the first joint and the given position and sets the first joint to the given position. Then it calculates the angles between the other joints and the position of the joints according to the previous joint.
This is the main idea of the inverse kinematics. The spine will try to resolve the position of the joints according to the given position by changing the angles between the joints.
This is a simple example of the inverse kinematics. As you can see the spine is trying to resolve the position of the joints according to the given position by changing the angles between the joints.
Now the fun part: Creating the fish
This part was a bit tricky to implement because on raylib api there was no function to draw filled ellipses with angles. So I had to create a function to draw filled ellipses with angles.
 1static void FillPolygon(const std::vector<Vector2> &polygon, Color color)
 2{
 3    if (polygon.size() < 3)
 4        return; // Not a polygon
 5
 6    // Determine the bounding box of the polygon
 7    float minX = std::numeric_limits<float>::max();
 8    float maxX = std::numeric_limits<float>::lowest();
 9    float minY = std::numeric_limits<float>::max();
10    float maxY = std::numeric_limits<float>::lowest();
11
12    for (const auto &v : polygon)
13    {
14        minX = std::min(minX, v.x);
15        maxX = std::max(maxX, v.x);
16        minY = std::min(minY, v.y);
17        maxY = std::max(maxY, v.y);
18    }
19
20    // Scanline fill algorithm
21    for (int y = static_cast<int>(minY); y <= static_cast<int>(maxY); ++y)
22    {
23        std::vector<int> intersections;
24
25        // Find intersections of the scanline with polygon edges
26        for (size_t i = 0; i < polygon.size(); ++i)
27        {
28            size_t j = (i + 1) % polygon.size();
29            const Vector2 &v0 = polygon[i];
30            const Vector2 &v1 = polygon[j];
31
32            if ((v0.y > y && v1.y <= y) || (v1.y > y && v0.y <= y))
33            {
34                float x = v0.x + (y - v0.y) * (v1.x - v0.x) / (v1.y - v0.y);
35                intersections.push_back(static_cast<int>(x));
36            }
37        }
38
39        // Sort intersections and fill between pairs of intersections
40        std::sort(intersections.begin(), intersections.end());
41
42        // Use drawpixel
43
44        for (size_t i = 0; i < intersections.size(); i += 2)
45        {
46            int x0 = std::max(static_cast<int>(minX), intersections[i]);
47            int x1 = std::min(static_cast<int>(maxX), intersections[i + 1]);
48            for (int x = x0; x <= x1; ++x)
49            {
50                DrawPixel(x, y, color);
51            }
52        }
53    }
54}
This is the FillPolygon function that I have created to draw any polygon with a given color. It uses the scanline fill algorithm to fill the polygon.
 1#define NUM_SEGMENTS 30
 2
 3static void DrawFilledEllipse(Vector2 center, Vector2 radius, float angle, Color color)
 4{
 5    // Number of segments to approximate the ellipse
 6    const int segments = NUM_SEGMENTS;
 7
 8    // Create an array to store the vertices of the ellipse
 9    std::vector<Vector2> vertices(segments + 1);
10
11    // Compute angle increment for each segment
12    float angleIncrement = 2.0f * PI / segments;
13
14    // Calculate vertices
15    for (int i = 0; i < segments; ++i)
16    {
17        float theta = angleIncrement * i;
18        Vector2 point = {
19            center.x + radius.x * cosf(theta),
20            center.y + radius.y * sinf(theta)};
21
22        // Rotate the point around the center
23        Vector2 pointRel = Vector2Subtract(point, center);
24        pointRel = Vector2Rotate(pointRel, angle);
25        vertices[i] = Vector2Add(center, pointRel);
26    }
27
28    // Close the fan loop by repeating the first vertex
29    vertices[segments] = vertices[0];
30
31    FillPolygon(vertices, color);
32}
Now on here, I have created the DrawFilledEllipse function to draw a filled ellipse with a given center, radius, angle, and color. It calculates the vertices of the ellipse and fills the ellipse with the FillPolygon function.
With these functions, I can easily create a body and fins fot the fish.
 1void Fish::Draw()
 2{
 3    DrawVentralFins(
 4        m_spine.m_joints[0],
 5        m_spine.m_angles[0],
 6        m_bodyWidth[0],
 7        m_finColor
 8    );
 9    DrawPectoralFins(
10        m_spine.m_joints[1],
11        m_spine.m_angles[1],
12        m_bodyWidth[1],
13        m_finColor
14    );
15    DrawBody(
16        m_spine.m_joints,
17        m_spine.m_angles
18    );
19    DrawEyes(
20        m_spine.m_joints[0],
21        m_spine.m_angles[0],
22        m_bodyWidth[0],
23        m_finColor
24    );
25    DrawDorsalFin(
26        m_spine.m_joints[0],
27        m_spine.m_angles[0],
28        m_bodyWidth[0],
29        m_finColor
30    );
31}
32
33void Fish::DrawPectoralFins(const Vector2 &position, float angle, float m_bodyWidth, Color color)
34{
35    DrawFilledEllipse(
36        {position.x - cosf(angle) * m_bodyWidth / 6 + sinf(angle) * m_bodyWidth / 2,
37        position.y - sinf(angle) * m_bodyWidth / 6 - cosf(angle) * m_bodyWidth / 2},
38        {7.5, 12.5},
39        angle - PI / 8,
40        color
41    );
42
43    DrawFilledEllipse(
44        {position.x - cosf(angle) * m_bodyWidth / 6 - sinf(angle) * m_bodyWidth / 2,
45        position.y - sinf(angle) * m_bodyWidth / 6 + cosf(angle) * m_bodyWidth / 2},
46        {7.5, 12.5},
47        angle + PI / 8,
48        color
49    );
50
51    Vector2 jointPos = m_spine.m_joints[m_spine.m_joints.size() - 8];
52
53    float jointAngle = m_spine.m_angles[m_spine.m_joints.size() - 8];
54
55    DrawFilledEllipse(
56        {
57            jointPos.x +
58                cosf(jointAngle) * m_bodyWidth / 6 +
59                sinf(jointAngle) * m_bodyWidth / 2,
60            jointPos.y +
61                sinf(jointAngle) * m_bodyWidth / 6 -
62                cosf(jointAngle) * m_bodyWidth / 2
63        },
64        {3, 5},
65        jointAngle - PI / 4,
66        color
67    );
68
69    DrawFilledEllipse(
70        {
71            jointPos.x +
72                cosf(jointAngle) * m_bodyWidth / 6 -
73                sinf(jointAngle) * m_bodyWidth / 2,
74            jointPos.y +
75                sinf(jointAngle) * m_bodyWidth / 6 +
76                cosf(jointAngle) * m_bodyWidth / 2
77        },
78        {3, 5},
79        jointAngle + PI / 4,
80        color
81    );
82}
Now if we look at these two function Draw and DrawPectoralFins, we can see that I have created the body, eyes, dorsal fin, and pectoral fins of the fish. I have used the DrawFilledEllipse function to draw the fins and body of the fish. Also the angle of the fins and body are calculated according to the spine of the fish.
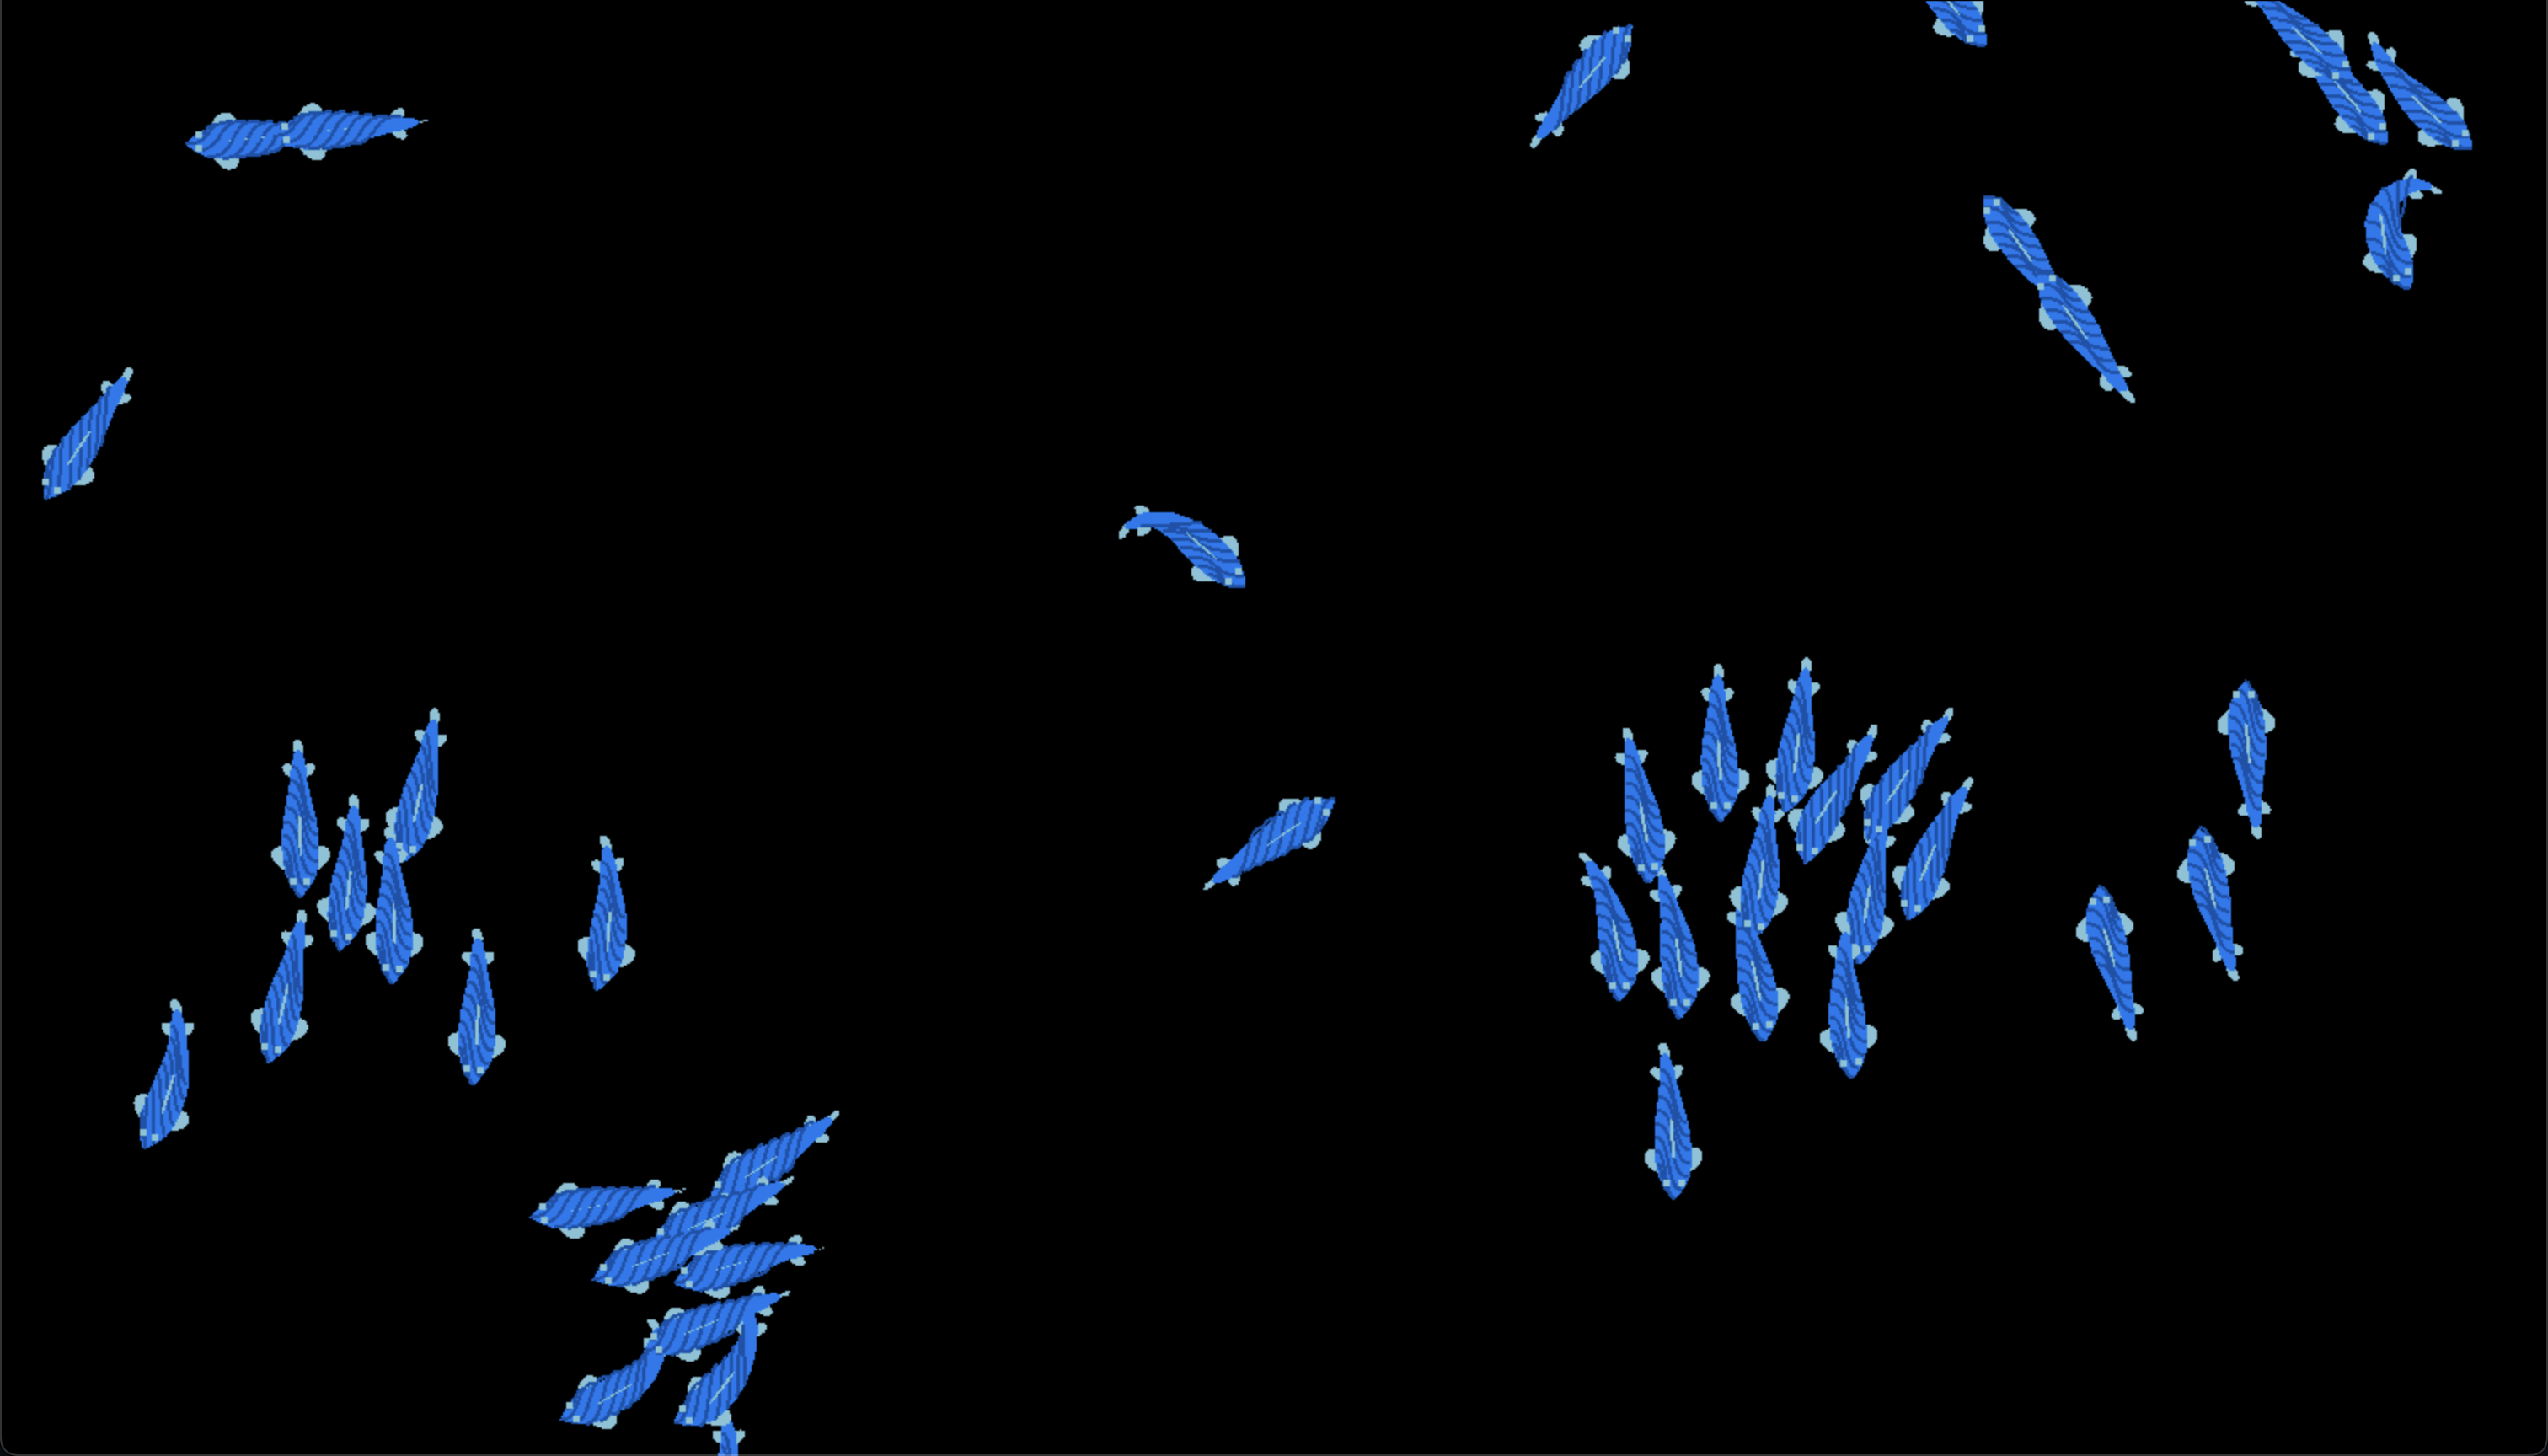
This is the result of the fish simulation. As you can see the fish is created from the boids and inverse kinematics. The fish has a body, eyes, dorsal fin, and pectoral fins. The body and fins are created from the spine and the spine of the fish is created from the inverse kinematics.
You can also find the live project on here: Boids
Conclusion
This was a fun project to create. I have learned a lot about boids and inverse kinematics. I have also learned how to create a fish from the boids and inverse kinematics. I hope you have enjoyed reading this article as much as I have enjoyed creating this project. If you have any questions or suggestions feel free to ask.